WordPress database error: [Table './quadium_wrdp27/wp_postmeta' is marked as crashed and should be repaired]
INSERT INTO wp_postmeta (post_id,meta_key,meta_value)VALUES (1,'enddate','')

WordPress database error: [Table './quadium_wrdp27/wp_postmeta' is marked as crashed and should be repaired]
INSERT INTO wp_postmeta (post_id,meta_key,meta_value)VALUES (1,'shortname','')

WordPress database error: [Got error 28 from storage engine]
SHOW FULL COLUMNS FROM `wp_options`

WordPress database error: [Got error 28 from storage engine]
SELECT t.*, tt.*, tr.object_id FROM wp_terms AS t INNER JOIN wp_term_taxonomy AS tt ON tt.term_id = t.term_id INNER JOIN wp_term_relationships AS tr ON tr.term_taxonomy_id = tt.term_taxonomy_id WHERE tt.taxonomy IN ('category', 'post_tag', 'post_format') AND tr.object_id IN (77, 3010, 8415, 8457, 9625) ORDER BY t.name ASC

WordPress database error: [Table './quadium_wrdp27/wp_postmeta' is marked as crashed and should be repaired]
SELECT post_id, meta_key, meta_value FROM wp_postmeta WHERE post_id IN (77,3010,8415,8457,9625) ORDER BY meta_id ASC

craft – Frugal Novice
Browsing Tag

craft

DIY “Message in a Bottle” Pirate Invitations

WordPress database error: [Table './quadium_wrdp27/wp_postmeta' is marked as crashed and should be repaired]
SELECT post_id, meta_key, meta_value FROM wp_postmeta WHERE post_id IN (9630,9629,9628,9627) ORDER BY meta_id ASC

Note: I received items from OrientalTrading.com to facilitate my craft/invitations. I was not compensated monetarily for my post. All opinions are honest and are my own.

Our middle son’s birthday is right around the corner – next week! – and he’s been excited about his party for a month or so now. He decided to have a pirate theme, and we immediately started looking for ideas on ways to make it special.

Of course, the first item on party prep is invitations, and as a graphic designer it’s always one of my favorite things to do. It’s a fun way to set the tone for your party, and it’s a great way to get creative without it taking too much time or costing too much money.

We went to OrientalTrading.com to look for invitation and party favor ideas, and we found SO many great items perfect to go with our party theme… and we found awesome DIY message in a bottle kits that we just had to get for invitations.

Invitations_OrientalTrading_ScreenShot


I created a 4″x8″ invitation for us to roll up and put inside the bottles, along with one pirate coin.  The top of the invitation reads, “Ahoy Matey! Here lies one piece of pirate gold. The rest of the treasure is missing, & Captain Colin needs your help to find it!”

Invitations_Coins_OrientalTrading


The bottles open easily from the bottom so you can stick whatever small items in them you’d like – you could do seashells, sand, or any other beach/nautical items that go along with your theme.

InvitationBottlesTwo_OrientalTrading


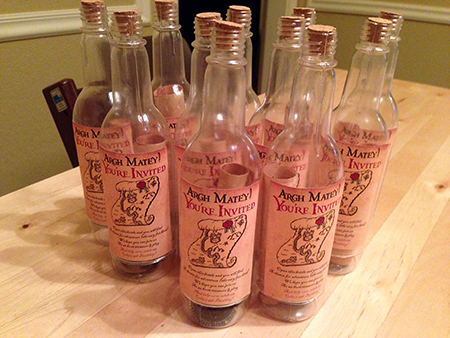
Here are the finished invitations – I used double-stick tape to adhere a label to the outside, and it reads:

Argh Matey! You’re invited

Open this bottle and you will find, a chance for adventure (the very fun kind)

We hope you can join us as we hunt treasure and play,

And help us to celebrate Colin’s 5th birthday!

InvitationBottles_OrientalTrading


The best part about these invitations? They’re SO inexpensive. We printed the invitations ourselves. Twelve bottles just cost $13.50, and it’s $5.00 for 144 coins (the rest of the coins are going in goody bags). Our son took the invitations to school and handed them out, so we didn’t even have to pay shipping.

Aren’t the invitations so fun? I can’t wait to show you the rest of the great party favors we found at Oriental Trading – be sure and keep an eye out for my post-birthday write-up coming in the next couple of weeks!

How To: DIY Custom Snow Globes

WordPress database error: [Table './quadium_wrdp27/wp_postmeta' is marked as crashed and should be repaired]
SELECT post_id, meta_key, meta_value FROM wp_postmeta WHERE post_id IN (8458,8462,8461,11880) ORDER BY meta_id ASC

There’s something almost magical about snow globes. I’ve loved them since childhood, and our kids love them now too. So I, of course, excitedly said yes when my friend Kristi asked if I’d want to make personalized snow globes with her. This is a perfect craft to do for kids (or with kids, if yours are a little older) – it’s creative, fun, and inexpensive.

Materials for this project are pretty simple:

  • A jar for each globe (you can use jars from your fridge that you’ve cleaned, or get mason jars for pretty cheap)
  • Hot glue gun
  • Water
  • Glitter
  • Photos, trimmed out and laminated
  • Any other additions you’d like – garland/tree branches, beads, etc.


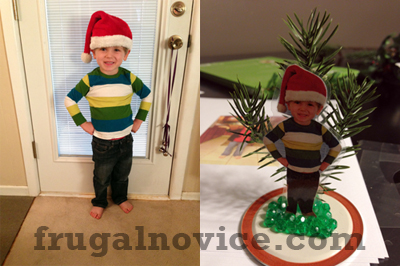
Start by taking a photo of each child. For ours I tried to have a Christmas theme. C is wearing a Santa hat, J is holding our elf, Orville, and E has a little Lego Christmas tree propped in front of her. Then print your photos on plain old printer paper, trim out

the background, and laminate them. When you cut out the laminated image, make sure to leave extra around the photo so it stays sealed and water doesn’t reach your image.

I bought a sprig of garland at the craft store and we pulled pieces off to serve as the background for our photos. Kristi had some small gravel and we also had some green beads to hot glue around the feet to help secure the photo.

One note – make sure that you don’t glue anything too close to the edge of the lid – it’ll make it difficult to close the jar securely (and it really doesn’t show up very much at all, so don’t worry about needing to cover the whole thing).

Once you’ve finished securing everything to the lid, fill your jar with water and glitter, along with any other little items you’d like. For the girls, we used some more green beads, and for the boys we added some small Lego pieces. Make sure to not fill the jar ALL the way to the top, because you have to account for the items displacing a little of the liquid.

When we were looking for tips, we saw some people suggest using baby oil to slow the glitter down a bit. We tried this, and the glitter initially clumped together like big blobs in a lava lamp. I ended up rinsing all of mine out, and I think it works just fine with only water.

Once you’re happy with how your jars look, use hot glue to secure the lid. We put a bead around the edge, and then on the bottom, too – where the two parts of the lid meet. The bead of glue on the bottom also serves to keep the jars from sliding around as much, which is nice.

Here are the finished products – what do you think?

We’re going to add some ribbon around ours to hide the glue, but otherwise I think they’re pretty perfect! The kids really like them, too – well, the boys, anyway. :)

Easy-DIY-SnowGlobes-FrugalNovice

DIY Christmas Card Holder

WordPress database error: [Table './quadium_wrdp27/wp_postmeta' is marked as crashed and should be repaired]
SELECT post_id, meta_key, meta_value FROM wp_postmeta WHERE post_id IN (8416,6104) ORDER BY meta_id ASC

In years past, I have to confess we’ve just scotch-taped Christmas cards to our back door. This year I thought I’d try something a little more purposeful, so I set out to Michael’s in search of an inexpensive, easy Christmas card holder to make. I came across some white boards cut out in various shapes for just $3, and inspiration struck.

I painted the board with chalkboard paint we already had on hand from our kitchen border project, but you can buy a small bottle of it at Michael’s (it retails for $6, but you can usually find 40% off coupons to make it cheaper). Then I hot-glued strands of ribbon to the back of the board in alternating red & green colors, and trimmed the bottoms to look nice and neat.

I decided to go with “Season’s Greetings” for the message, but what I really love about this project is you can change the wording each year. I think kids would have a lot of fun helping with decorating the board, don’t you?

To adhere cards to this holder, I bought some small clothes pins. I thought about embellishing those, but I decided I wanted the cards to really stand out so I left them plain.

I’m kind of in love with this simple solution for cards (and the fact that it’ll take up very little space in our Christmas storage once we have to pack it away)!  How do you display your Christmas cards?

Christi

You might also like this post:

10 Creative & Easy Christmas Desserts!


Free Easter Basket Craft – Printable Download!

Easter is right around the corner, and I’m sharing a fun craft for you – an Easter Treat Basket. This is a great project to do one-on-one at home, but you could also do this at a school party and then let children fill their baskets with treats. Fun and easy!

Once you’ve printed your page for the Easter basket from the PDF (I’ll link to the file at the end of this post), let your kids color to their hearts’ content. I had fun coloring one for an example – you might want to do this project  yourself, too! One note – make sure you fill out the “to” and “from” part now, because this will be on the bottom of the basket once it’s complete.

Continue Reading…

Pizza Art

WordPress database error: [Table './quadium_wrdp27/wp_postmeta' is marked as crashed and should be repaired]
SELECT post_id, meta_key, meta_value FROM wp_postmeta WHERE post_id IN (78,24) ORDER BY meta_id ASC

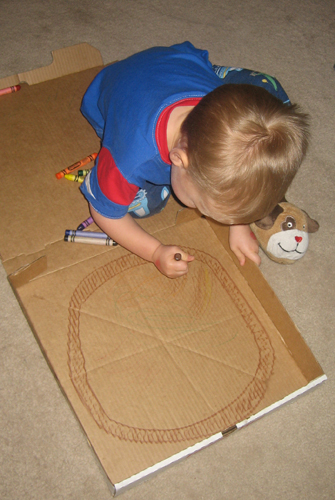
I’ve discovered a new use for pizza boxes! We had an empty one sitting on the dining table to go put with recycling, when J pulled it down on to the floor. Inspiration struck and I pulled out the box of crayons for him to color his own pizza. I drew the crust for him, but he did the rest! He got pretty creative with the toppings – purple “jelly”, red “salsa” (why on earth would you have red pizza sauce when you could have salsa on your pizza, anyway?), and brown “chocolate.”

See that oddly-shaped crust I drew? It’s “artisan crust.” Right…

Now, you could really get creative with this. If you save the circular cardboard from the bottom of a frozen pizza, you could cut that into wedges for “crust.” Your kiddos could paint red for sauce, you could cut little strips of white paper to be shredded mozzarella cheese, and you could draw (or even print from the internet) different toppings on paper to cut out and paste on. Free play food!