WordPress database error: [Table './quadium_wrdp27/wp_postmeta' is marked as crashed and should be repaired]
INSERT INTO wp_postmeta (post_id,meta_key,meta_value)VALUES (1,'enddate','')

WordPress database error: [Table './quadium_wrdp27/wp_postmeta' is marked as crashed and should be repaired]
INSERT INTO wp_postmeta (post_id,meta_key,meta_value)VALUES (1,'shortname','')

WordPress database error: [Table './quadium_wrdp27/wp_postmeta' is marked as crashed and should be repaired]
SELECT post_id, meta_key, meta_value FROM wp_postmeta WHERE post_id IN (1510,9528,9539,9544,9553,9564,9583,9587,9608,9615,9621,9625) ORDER BY meta_id ASC

Frugal Novice

DIY “Message in a Bottle” Pirate Invitations

WordPress database error: [Table './quadium_wrdp27/wp_postmeta' is marked as crashed and should be repaired]
SELECT post_id, meta_key, meta_value FROM wp_postmeta WHERE post_id IN (9630,9629,9628,9627) ORDER BY meta_id ASC

Note: I received items from OrientalTrading.com to facilitate my craft/invitations. I was not compensated monetarily for my post. All opinions are honest and are my own.

Our middle son’s birthday is right around the corner – next week! – and he’s been excited about his party for a month or so now. He decided to have a pirate theme, and we immediately started looking for ideas on ways to make it special.

Of course, the first item on party prep is invitations, and as a graphic designer it’s always one of my favorite things to do. It’s a fun way to set the tone for your party, and it’s a great way to get creative without it taking too much time or costing too much money.

We went to OrientalTrading.com to look for invitation and party favor ideas, and we found SO many great items perfect to go with our party theme… and we found awesome DIY message in a bottle kits that we just had to get for invitations.

Invitations_OrientalTrading_ScreenShot


I created a 4″x8″ invitation for us to roll up and put inside the bottles, along with one pirate coin.  The top of the invitation reads, “Ahoy Matey! Here lies one piece of pirate gold. The rest of the treasure is missing, & Captain Colin needs your help to find it!”

Invitations_Coins_OrientalTrading


The bottles open easily from the bottom so you can stick whatever small items in them you’d like – you could do seashells, sand, or any other beach/nautical items that go along with your theme.

InvitationBottlesTwo_OrientalTrading


Here are the finished invitations – I used double-stick tape to adhere a label to the outside, and it reads:

Argh Matey! You’re invited

Open this bottle and you will find, a chance for adventure (the very fun kind)

We hope you can join us as we hunt treasure and play,

And help us to celebrate Colin’s 5th birthday!

InvitationBottles_OrientalTrading


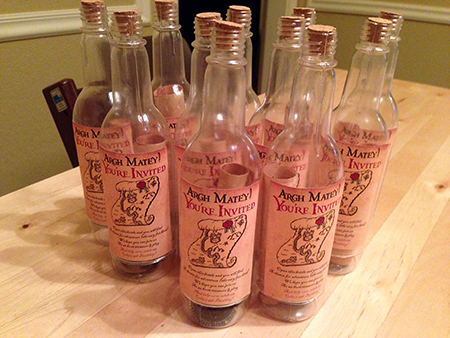
The best part about these invitations? They’re SO inexpensive. We printed the invitations ourselves. Twelve bottles just cost $13.50, and it’s $5.00 for 144 coins (the rest of the coins are going in goody bags). Our son took the invitations to school and handed them out, so we didn’t even have to pay shipping.

Aren’t the invitations so fun? I can’t wait to show you the rest of the great party favors we found at Oriental Trading – be sure and keep an eye out for my post-birthday write-up coming in the next couple of weeks!

Wordless Wednesday: A Kid’s Best Friend

WordPress database error: [Table './quadium_wrdp27/wp_postmeta' is marked as crashed and should be repaired]
SELECT post_id, meta_key, meta_value FROM wp_postmeta WHERE post_id IN (9622) ORDER BY meta_id ASC

WordlessWednesday

Our sweet, full-of-energy Lab puppy Sally was totally willing to hang out with J and serve as a pillow/video game buddy. Man’s Kid’s best friend, indeed!

Wordless Wednesday: Lego

WordPress database error: [Table './quadium_wrdp27/wp_postmeta' is marked as crashed and should be repaired]
SELECT post_id, meta_key, meta_value FROM wp_postmeta WHERE post_id IN (9616) ORDER BY meta_id ASC

Wordless_Wednesday_Lego
Our boys (& my husband!) could sit and play with LEGO bricks for hours. I love how creative they are with them, and how they work together on building.*

*This is just a teeny tiny portion of our bricks. When I say we love LEGO, we love LEGO. 


Mini Pizza Pot Pies Recipe – A New Tra-Dish!

WordPress database error: [Table './quadium_wrdp27/wp_postmeta' is marked as crashed and should be repaired]
SELECT post_id, meta_key, meta_value FROM wp_postmeta WHERE post_id IN (9609,9610,9599,9601,9602,9603,9606,9607,9604,9598) ORDER BY meta_id ASC

Note: I received a gift card to procure ingredients for my recipe. All opinions are honest and are entirely my own.
tradish_logo_300x300
We love to cook in our house, and trying different flavor combinations for pizza is something we do pretty often – we’ve found some combos we just love over the years! One thing we haven’t ever played around with – until now – is the format of the pizza. It’s always just been dough on bottom, sauce, cheese, toppings. Ragú inspired us to do something completely different, and the recipe we discovered is going to be a new staple in our recipe rotation!

UpsideDownPizza-Ragu

I was inspired by Ragú’s Upside-Down Deep Dish Pizza recipe  – you can see from the photo above that it looks pretty amazing! We decided to have our good friends come over for dinner, and since there were going to be 5 kids involved in this dinner, I thought it would be fun to make mini versions of the recipe using a muffin tin. I’ll include the ingredients and directions at the bottom of the post so you can try making this recipe, too! And don’t forget to check out Ragú’s Facebook page to find even more recipes to try

We used Ragú® Old World Style® Pasta Sauce instead of pizza sauce, and oh my word we should’ve been doing this all along for our pizzas. There is so much more flavor packed into this sauce than others we’ve used before, and I like that it sneaks servings of veggies in for the kids. Each jar  is made with 11 juicy tomatoes, making it Ragú’s richest, thickest recipe.

My friend Kristi used two sizes of plastic cups to cut out rounds of pizza dough – a larger round went into the bottom of the muffin tin, and we used the smaller one to top it off:

Ragu_CuttingDough

Ragu_MeatSauce_Stove

We used a variety of combinations to fill the pizzas. For some we used ground beef mixed with some of the Ragú® Old World Style® Pasta Sauce, some had spinach, some had pepperoni, and some had a mixture of the three, along with shredded mozzarella.

Ragu_Pizza_Cheese

Ragu_Pizza_IngredientsSauce

Once all the pizzas were filled, we topped off the dough and folded the edges of the top and bottom together to get a nice seal. We also snipped a small slit in the top to allow steam to escape while baking.

Ragu_Pizzas_ReadyToBake

We baked these until the dough on top was golden brown, and they popped out of the muffin tin really easily. Don’t they look delicious?

Ragu_Pizzas_Stacked

And each one is filled with all sorts of flavor:

Ragu_Pizza_Inside

They were a hit with everyone!

J_Ragu_Pizza

These would be great for grab & go dinners, because it would be incredibly easy to eat these while you’re out and about. They make nice leftovers, too – just pop a couple in your lunch bag and you’re all set at work the next day!

Is your mouth watering yet? Here’s the recipe so you can go home and make these tonight:

Ingredients:

  • Ragú® Old World Style® Pasta Sauce
  • 1 lb. lean ground beef
  • 1 box frozen chopped spinach, thawed and squeezed dry
  • Mozzarella cheese
  • Pizza dough, either store-bought or homemade
  • Pepperoni
  • Any other ingredients you’d like to add! Red peppers, onions, olives, and mushrooms could all be great additions.

Directions: 

  1. Preheat your oven to 375 degrees.
  2. Cut out a round of pizza dough to press into the bottom of a well in your muffin tin – there should be a little dough overhanging the edges so you can crimp it with the top layer of dough to seal! Put dough out for as many of the pizzas as you’d like to make. This recipe is versatile so you can do as few or as many as you’d like!
  3. Fill your pizzas with whatever combinations of ingredients sound best, making sure to have some Ragú® Old World Style® Pasta Sauce either in between layers or on the top so you have flavor and so your pizza isn’t dry. Don’t pile your ingredients any higher than the top of the muffin tin.
  4. Put a smaller round of pizza dough on top of your creation, and fold the edges from the bottom layer over, pressing to seal the two rounds of dough. Using kitchen shears, snip a small slit in the top of each one to allow steam to escape.
  5. Bake your pizzas until the dough is golden brown. Enjoy!

In the mood for all things Italian after reading about this recipe? Be sure and enter the Ragú Better and Better Sweepstakes for a chance to win great Authentic Italian themed prizes, including a grand prize trip to Italy for a family of four at www.RaguSweeps.com!


Pull-Ups First Flush Ambassador Check-In

WordPress database error: [Table './quadium_wrdp27/wp_postmeta' is marked as crashed and should be repaired]
SELECT post_id, meta_key, meta_value FROM wp_postmeta WHERE post_id IN (9341,9594,9589,9591,9590,9592) ORDER BY meta_id ASC

“I participated in a campaign on behalf of Mom Central Consulting (#MC) for Pull-Ups. I received product samples to facilitate my review and a promotional item as a thank you for participating.”

PullUps_Image

As I mentioned recently, I’m pretty stoked to be a Pull-Ups First Flush Ambassador. It’s awesome working with brands we truly love, and since Pull-Ups were so great with our two boys, we  know they’ll be a vital tool in potty training E, too. She is a full-on toddler now and Pull-Ups are a great way to introduce the idea of underwear to her with still having the safety net of absorbency for any accidents that happen in the early stages.

The designs on the Pull-Ups are great – pink with polka dots and Minnie Mouse’s face, which E definitely noticed and pointed at when I first showed her the Pull-Up. Fun designs definitely make an impact on how accepting kids will be of trying something new, so we appreciate that Huggies makes both the boy & girl Pull-Ups with fun, familiar characters on them.

PullUps_Front

Pull-Ups have amazing features to them, three of which really stand out to me:

CustomizedProtection

When there are inevitably accidents in the beginning part of potty training, it’s comforting to know that there are extra-absorbent spots in the most important areas.

StretchyWaistband

These are SO easy to pull up and down, and the elasticity also provides a nice snug fit.

EasyOpenSides

SO, SO, SO important to still be able to open the Pull-Up on the sides – I love that this feature is included!

One tip that is important to remember when potty training is to make sure your child isn’t wearing clothes that make going more difficult. Pants with buttons should be avoided. When you’re around the house, you can just let your child run around with a shirt and their Pull-Up on to make it even easier!

PullUps_Back_FarAway

Huggies doesn’t just provide products to help parents with potty training, though. Be sure and check out all the different tools and resources they offer, too, available on the Big Kid Academy via the Pull-Ups websiteFacebook page, and Twitter page. These make it even easier to start potty training and celebrate milestones!

There’s also a Big Kid App available on Apple and Android smart phones. The app offer videos and songs and a Big Kid checklist to help your little one in his or her nighttime routine. I have an iPhone and love the app – it’s nice that I’ve got something right at my fingertips no matter if we’re home or visiting grandparents out of town!

Wordless Wednesday: Style Tips from Baby E

WordPress database error: [Table './quadium_wrdp27/wp_postmeta' is marked as crashed and should be repaired]
SELECT post_id, meta_key, meta_value FROM wp_postmeta WHERE post_id IN (9584) ORDER BY meta_id ASC

Baby E says: Look to your favorite things for style inspiration. For example, if you need a hat, a baby doll makes a unique fashion statement.

BabyE_Hat


Magic Castle Bounce House by Blast Zone: Review and Giveaway!

WordPress database error: [Table './quadium_wrdp27/wp_postmeta' is marked as crashed and should be repaired]
SELECT post_id, meta_key, meta_value FROM wp_postmeta WHERE post_id IN (9569,9570,9567,9568,9565,9571,9572) ORDER BY meta_id ASC

Note: We received a bounce house to facilitate our review. We were not compensated monetarily for this post. All opinions are honest and are our own.

Whenever our kids go to a birthday party, they’re always thrilled if there’s a bounce house. Our oldest is 6 and our youngest is 18 months old, but they all three equally have a blast jumping in them – it’s really the perfect entertainment option for parties, and both of our older kids have asked to have bounce houses at their parties before.

You can imagine their utter delight, then, when we surprised them with our very own Magic Castle bounce house! They ran right to it and got to jumping. It’s a perfect size for our kids – all three were easily jumping at the same time and it was plenty of space. You’ll notice in the photos below that we set it up inside – we’re in a new-construction house that doesn’t have a yard installed yet, so our outdoor space isn’t ideal for playing. That’s okay, though, because the Magic Castle fit great inside our play area.

Here are some shots of the bounce house before we inflated it, as it was inflating, and once it was complete – and it only took ONE MINUTE to set it up, which we were completely impressed with. We just plugged in the blower (the yellow unit you’ll see in the left of the first photo), secured the bounce house tube to the blower, tied off the additional tube (the yellow piece you see on the left of the photo about 2/3 of the way from the top), and flipped the switch.

BounceHouse_NotInflated

BounceHouse_PartiallyInflated

BounceHouse_FullyInflated

Here you can see the boys – a blur – jumping in the house. Our oldest son is about 4 feet tall, if you’d like some perspective on how tall the sides are compared to the kids.

BounceHouse_JC

The quality of the material is what you’d expect in a commercial-grade inflatable. It’s sturdy vinyl and the house held up really well to all our kids’ antics. They thought wrestling in the Magic Castle was a lot of fun, and we love it because it’s a nice soft surface for them to roughhouse on. You can see in the photo above that there’s a good amount of space around them.

We let their little sister get in with them, and she loved it just as much as they did! We  love the velcro enclosure on the entrance to the Magic Castle, because we knew none of the kids (especially our youngest) could just slip out of the entrance.

BounceHouse_AllThreeKids

The kids’ aunt and uncle even took turns getting in the bounce house with them, and although it’s not big enough for adults to jump in, it held up perfectly well to them sitting in side along with the kids jumping.

BounceHouse_WithJared

BounceHouse_WithLauren

This is one of Blast Zone’s most popular inflatables, and we can definitely see why. Here’s their description of the Magic Castle:

The Magic Castle is our most popular bounce house! This bigger, improved version of the classic Blast Zone castle blows up in seconds, and easily holds 3 kids or 300 pounds of little party-hoppers! The “Safe Slope” Slide provides safe, easy access, and the surrounding netting and Hook-and-loop fastener entrance will keep kids safe while they bounce and have a blast! The extra-durable commercial vinyl floor, and reinforced seams add extra bouncing life. The Magic Castle is an ideal bounce house for backyards, indoors, sleepovers and more. The UL-Approved blower supplies air continuously to the unit, while kids play safely on a pillow of air. The Magic Castle is designed with extra high walls and netting, reaching a full 60″ from the bounce platform! Kids are safely enclosed at all times, yet the spires are low enough to clear standard ceilings. Every little prince or princess loves bouncing around in his or her own bouncy castle. The Magic Castle by Blast Zone is so easy to set up that mom, dad, grandma, or grandpa can set it up in seconds, whenever they want to play. And the Magic Castle bounce house can fit in areas small and large alike. The Magic Castle is tall enough to keep kids playing safely, but low enough to be used in most indoor areas.

If you rent a bounce house, you’re looking at spending $60-$100 per rental – that can add up FAST. The Magic Castle is less than $300 on Amazon, so you get MUCH more value for your money. In the two weeks we’ve owned the bounce house, we’ve used it on 6 different days, and multiple times on some of those days! We know we’ll get a lot of use out of it year-round (just think about snow days, parents! No more wondering how to keep your kids from going stir-crazy… you can just blow up the Magic Castle and let them get all of their energy 0ut!).

Because I am such a big fan of the Magic Castle (and, let’s be honest, still geeking out a little that we own our own bounce house!!!) I am especially thrilled that I get to host a giveaway so one of you can have one of your own, too! Just enter via the Rafflecopter below. Good luck, everyone!!

a Rafflecopter giveaway

Wordless Wednesday: Master Builders!

WordPress database error: [Table './quadium_wrdp27/wp_postmeta' is marked as crashed and should be repaired]
SELECT post_id, meta_key, meta_value FROM wp_postmeta WHERE post_id IN (9554,9555,9556) ORDER BY meta_id ASC

I love free activities for the kids, so I can’t believe we hadn’t attended one of the Lowe’s kids workshops until this past weekend. C & J loved building their birdhouses, and couldn’t get over that they’d used real nails and built something almost entirely by themselves. They also each got an apron, and a birdhouse patch for me to iron on. We’ll definitely be going to more of these!
C_Building J_Building JC_Builders

Huggies Slip-Ons are Perfect for Toddlers Always On-The-Move!

WordPress database error: [Table './quadium_wrdp27/wp_postmeta' is marked as crashed and should be repaired]
SELECT post_id, meta_key, meta_value FROM wp_postmeta WHERE post_id IN (9549,9548,9546,9550,9551,9561,9547,9545) ORDER BY meta_id ASC

“I participated in an Influencer Activation on behalf of Mom Central Consulting for Huggies. I received product samples to facilitate my review and to thank me for my participation.”

We are in full-fledged toddler mode in our house. E is 18 months old and runs around the house constantly, whether it’s to transfer her baby dolls from their crib to their strollers, or to chase after her two big brothers. Regardless of what the instance is, she does not want to sit still… which means diaper changes can be a real challenge!

Thankfully HUGGIES has a great solution for busy babies and toddlers – Little Movers Slip-On Diapers! I’ve got a link to a coupon for these, too, by the way – $1 off (or $1.50 off if you share a link with three friends)! Just click here to access the coupon.

HuggiesSlipOns_Size4 HuggiesSlipOns_Size3

These diapers don’t require any opening or adjusting – you just slip them on, meaning your child doesn’t even have to lay down.

HuggiesSlipOns_FrontBack


The Little Movers Slip-On Diapers are made with stretchy sides, so they provide a great fit without adjustment- they slip on easily and off easily, too. Last night was a perfect moment for me to test out just how effective these diapers are. E was busy looking at a book and could not be bothered to lay down for a diaper change – but it was really easy to have her step into the diaper.

HuggiesSlipOns-InAction

HuggliesSlipOns_Standing


Instagram_Huggies_SlipOns

What I love is that you don’t lose the benefits of traditional diapers. These have Leak Lock Protection, which absorb wetness and lock it away from your baby’s skin. I wondered the question I think many of you are thinking too… what happens when they have a dirty diaper?

Easy – the sides can be opened like traditional diapers for those instances when you need to do so.

HuggiesSlipOns_SideOpening

We love these diapers – they provide us with a really quick diaper-changing experience. E is used to stepping into her pants and shorts, so she is happy to step into her diaper and we don’t get the fussing that we do sometimes when we lay her down for a diaper change. The fit and absorbency are both top-notch, and we’d definitely recommend them to other families with babies who are standing and walking.

HuggiesSlipOns_Collage

Here’s a commercial for the Slip-Ons to give you an even better idea of how they work:

Don’t forget, to access a coupon for these diapers just  click here

{Wordless Wednesday} Baby E is 18 months old!

WordPress database error: [Table './quadium_wrdp27/wp_postmeta' is marked as crashed and should be repaired]
SELECT post_id, meta_key, meta_value FROM wp_postmeta WHERE post_id IN (9540,9541) ORDER BY meta_id ASC

I can hardly believe that this tiny little baby…
E_BrianShoulder
…is old enough to be taking care of “babies” of her own.
E_Doll

Happy 18 months, E!

Two-For-One Recipe – Pasta Sauce AND Tomato-Basil Soup

WordPress database error: [Table './quadium_wrdp27/wp_postmeta' is marked as crashed and should be repaired]
SELECT post_id, meta_key, meta_value FROM wp_postmeta WHERE post_id IN (9529,9530,9532,9533,9534,9535,9536,9531) ORDER BY meta_id ASC

We love to cook from scratch – it’s something both Brian and I enjoy doing, especially when we’re able to work together in the kitchen. Of course, with us both working full time and having three children 6 & under, that doesn’t often leave us with much time to spend on meals. We’ve got one staple, though, that we have used during many a busy week. I’ve referenced it on the blog before, but I want to show you how easy it is to make homemade pasta sauce… and how it’s even easier  to turn that sauce into a delicious tomato-basil soup for leftovers.

Ingredients:

  • 4 tablespoons butter
  • 1 1/2 cups carrot, chopped
  • 1 medium onion, diced
  • 1 28-oz. can crushed tomatoes
  • 1 28-oz. can tomato sauce
  • 1 small can tomato paste
  • Fresh basil, chopped (we use about 14 leaves, but adjust according to your taste)

Directions:

Add carrots, onion and butter to your skillet, and sauté until they’re tender (don’t rush this process or your sauce won’t end up nearly as smooth).

OnionsCarrotsRaw


OnionsCarrotsCooked


Add your tomatoes & paste, and stir everything together well. Tear basil into smaller pieces and add to the mixture.

Sauce_Basil


Use an immersion blender to puree everything together. If you don’t have an immersion blender, (carefully!!) pour the mixture into a blender or food processor to puree the mixture.

Sauce_Blending


When you’re done, your sauce will look like this:

PastaSauce


A delicious pairing for your pasta!

SauceOnPasta


But let’s say the next night you’re not really in the mood for pasta. You’ve got sauce leftover (this recipe makes quite a bit), so what do you do? With one simple ingredient, you turn the sauce into a delicious soup that works great alongside a loaf of French bread or some toasty grilled cheese sandwiches. Just put your sauce back in a pot on the stove over low heat, and add cream or half & half (add and mix a little at a time, until the soup acquires the level of creaminess you prefer). Voila! 

TomatoSoup


I also have to share this tip with you, because – as avid basil users – it has made our lives so much easier. We would often purchase basil on Sunday at our weekly trip to the grocery store, and by the time we were ready to use it later in the week it was darker and wilted, not fresh and crisp like we’d prefer. I had tried keeping it in the fridge (which I learned was a no-no) and even tried keeping it at room temperature with paper towels wrapped around it to absorb any moisture. No luck! Still, our basil wasn’t staying fresh. Then I got this tip… it’s SO easy and it kept our basil perfectly fresh until we were ready to use it on a Thursday.

StoringBasil


Take your basil out of its package and put it (stem down) into a cup with about an inch of water in it. Put a plastic bag over top of the basil, and set it in a place that won’t get too warm. SO easy, right? Now you never have to fall victim to wilted basil again!

TWO Amazing Pizza Recipes

WordPress database error: [Table './quadium_wrdp27/wp_postmeta' is marked as crashed and should be repaired]
SELECT post_id, meta_key, meta_value FROM wp_postmeta WHERE post_id IN (9473,9474) ORDER BY meta_id ASC

BBQ-Pizza

BBQ Chicken Pizza

Ingredients:

  • 2 tablespoons olive oil
  • 1/2 pound chicken tenders (or about 1 cup once cooked and diced)
  • 2/3 cup BBQ sauce (we used Jack Daniels because we already had it on hand, but any kind will do – use your favorite!)
  • 3 tablespoons all-purpose flour, for dusting
  • 1 package pizza dough (we used Pillsbury because we were in a little bit of a rush, but next time I’ll make my own dough)
  • 3/4 cup shredded Gouda cheese
  • 1 cup shredded mozzarella cheese
  • 3/4 cup shredded Parmesan cheese
  • 1/2 medium onion, thinly sliced
  • 3 tablespoons chopped fresh cilantro leaves

Directions:

  1. In a medium skillet, saute the chicken in the olive oil until browned and cooked through. Once it’s cooked, remove from heat and chop.
  2. In a bowl, mix the chicken with 2 tablespoons of BBQ sauce; set aside.
  3. On a floured cookie sheet or pizza pan, roll your pizza dough out. Use the remainder of the BBQ sauce to spread evenly across the dough.
  4. Add the Gouda, mozzarella, and Parmesan cheese; then add the chicken and onions.One note: I don’t like crunchy onions, so I sauteed some in a separate skillet to put on my half of the pizza, and then put raw onions on Brian’s half. This worked out really well for us!
  5. Bake in a 400 degree oven for 15-20 minutes or until the crust is browned and the cheese is bubbly. Mine actually took a little less time than that, I think because I used a thin crust dough.
  6. Once you’ve removed the pizza from the oven, top with chopped cilantro and slice the pizza to serve. Enjoy!


Spinach-Pizza

Spinach, Onion, and Blue Cheese Pizza

Recipe courtesy of my friend Alexis

Ingredients:

  • Pizza crust
  • 2 large or 3 medium onions, sliced into rings
  • Salt
  • Oil
  • Sugar
  • Fresh spinach
  • 4-5 cloves of chopped garlic
  • Soy sauce
  • Crumbled blue cheese

Directions:

  1. Onions:  Sprinkle with salt. Place in frying pan over medium heat in about 2 TBSP oil & cook until bottoms start to brown, then start stirring. Add about 1-2 tsp sugar. Stir and cook until caramelized. Set aside.
  2. Spinach: Remove stems. In sautee pan, heat about 2TBSP olive oil. Add 4-5 cloves choppped garlic; when garlic starts to soften, add spinach and toss. Drizzle with a little soy sauce (just a touch), let spinach soften, remove from heat, and set aside.
  3. Assembly: Make crust per package instructions (I like to roll it out on a little cornmeal). Layer with onions, spinach, and then sprinkle with crumbled blue cheese. Cook about 6-8 minutes (per package instructions) HINT: if you heat the cookie sheet or whatever you are baking the pizza on in the oven while it is preheating, it helps the crust stay crisper!

We’re always on the lookout for new pizza recipes, and sometime I want to have friends over for a pizza night. We’d make the recipes I shared with you, plus a great appetizer pizza – Spread crescent roll dough out flat on a cookie sheet and bake according to directions, then top with cream cheese and chopped raw veggies (I like broccoli and carrots, personally). Now I just need to get a dessert pizza added to my repertoire and I’ll be all set!